Article: The BestPaintByNumbers Guide
The BestPaintByNumbers Guide
The Best Paint By Numbers Guide: Complete Guide
Advanced techniques and insider tips for stunning results
Professional Painting Techniques & Insider Tips
Master these techniques for stunning results
The Perfect Paint Application
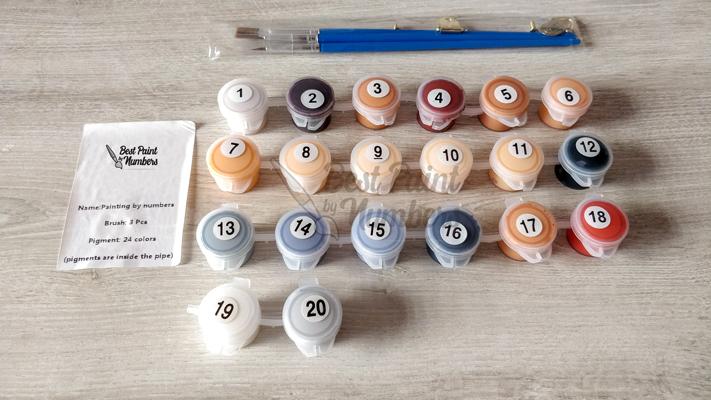
Our premium acrylic paints are specially formulated for optimal coverage:
- Each color is pre-mixed to the perfect consistency
- Paints provide smooth, even coverage
- Colors are vibrant and ready to use
- No water or mixing needed
Advanced Two-Cup Technique
This game-changing method ensures pristine colors and professional results:
- Set up two water cups before starting
- Use first cup for initial brush cleaning
- Use second cup for final rinse
- Replace water when it becomes cloudy
The Paper Guard Mastery
This professional technique prevents smudging and ensures clean work:
- Use any clean paper as a hand guard
- Slide the guard as you move across sections
- Prevents oils from your hand affecting the paint
- Especially crucial for detailed areas
Strategic Painting Sequence
Follow this proven approach for best results:
- Color Strategy: Complete all areas of one color before moving to the next
- Directional Technique: Work top to bottom to prevent smudging
- Left-Handed Approach: Paint right to left to keep your work pristine
- Section Method: Focus on completing one section fully before moving on
🎨 Advanced Techniques for Different Areas
Detail Work
- Use toothpick for precise dots and tiny areas
- Work with smallest brush for fine lines
- Take frequent breaks to maintain precision
Large Areas
- Use gentle, consistent pressure
- Work in systematic patterns
- Check coverage in good lighting
Edges and Borders
- Use brush tip for clean lines
- Let adjacent areas dry completely
- Work from larger to smaller areas
Specialized Painting Techniques
Master these techniques for different types of paintings
Portrait Techniques
- Eyes First: Always start with the eyes - they set the character of the portrait
- Facial Features: If wanted you can try to use toothpicks for precise detail in nose and lips
- Skin Tones: Work systematically to ensure even coverage
- Hair Details: Follow the natural flow direction of hair strands
Landscape Mastery
- Sky First: Always begin with the sky - it sets the mood
- Distance Effect: Paint background to foreground
- Tree Technique: Use light dabbing motions for foliage
- Water Reflections: Use gentle horizontal strokes
Custom Photo Techniques
- Color Recognition: Match numbers carefully with reference sheet
- Detail Preservation: Take extra care with meaningful details
- Background Treatment: Give equal attention to all areas
- Memory Points: Focus on capturing key features accurately
Creating the Perfect Painting Environment
Lighting Setup
- Natural Light: Best by a window during daylight hours
- Artificial Light: Use daylight bulbs for evening painting
- Angle Matters: Light should come from your non-dominant side
- Avoid Shadows: Ensure your hand doesn't cast shadows on work area
Ergonomic Workspace
- Surface Height: Table at elbow height when seated
- Canvas Angle: Slight tilt for better visibility
- Seating: Supportive chair with good back support
- Breaks: Stand up and stretch every 45-60 minutes
Detail Work & Fine Techniques
Small Area Mastery
Tiny Spaces
- Use toothpick for dot-like areas
- Create precise lines with brush tip
- Work under good lighting
- Use magnifying tool if needed
Number Coverage
- Take reference photos before starting
- Work systematically in small sections
- Double-check numbers against reference sheet
- Mark completed areas on reference sheet
Edge Control
- Use minimal paint near edges
- Clean brush thoroughly between colors
- Let adjacent areas dry completely
- Use paper guard for support
Professional Finishing Techniques
- Final Review: Check all areas in different lighting
- Touch-ups: Keep some paint aside for final adjustments
- Completion Check: Use reference sheet to verify all areas
- Documentation: Take final photo when complete
Expert Solutions for Common Challenges
Coverage Issues
-
Uneven Coverage:
- Apply thin, even layers
- Let each layer dry completely
- Avoid overworking wet paint
- Check in good lighting
Detail Areas
-
Tiny Numbers:
- Use phone camera to zoom in
- Take section photos before starting
- Work systematically left to right
- Use reading glasses or magnifier
Color Management
-
Paint Storage:
- Always close pots tightly
- Store at room temperature
- Keep away from direct sunlight
- Save extra paint for touch-ups
Advanced Problem Prevention
Before You Start Each Session:
- Ensure good lighting
- Organize paints numerically
- Clean brushes thoroughly
- Secure canvas properly
- Prepare two water cups
- Have paper towels ready
Creating Special Effects
Water & Reflections
- Paint background water first
- Use gentle horizontal strokes
- Build up layers for depth
- Match reflection colors carefully
Sky & Clouds
- Work in one direction
- Use light, even pressure
- Create smooth transitions
- Build gradual color changes
Texture Effects
- Fur: Use directional strokes
- Grass: Light upward strokes
- Stone: Dabbing motion
- Fabric: Follow the fold lines
Advanced Brush Techniques
Brush Control
- Grip: Hold like a pencil, about 1 inch from bristles
- Pressure: Light touch for details, firmer for larger areas
- Movement: Use your whole arm for smooth strokes
- Direction: Work in consistent direction for uniform look
Detail Work
- Tiny Areas: Use just the brush tip
- Fine Lines: Roll brush slightly while drawing line
- Dots: Light touch and lift straight up
- Corners: Use brush tip at 45° angle
Creative Enhancement Tips
Making Your Painting Unique
- Take progress photos to document your journey
- Consider adding a signature when complete
- Document your color sequence for reference
- Create a time-lapse of your work
Time Management & Project Planning
Optimal Painting Sessions
-
Time Blocks:
- 45-60 minute focused sessions
- 15-minute breaks between sessions
- 2-3 sessions per sitting maximum
- Set a gentle timer to avoid eye strain
Project Planning
-
Efficient Approach:
- Start with largest areas first
- Group similar colors together
- Plan around natural drying time
- Mark completed sections on reference sheet
Progress Tracking
- Take daily progress photos
- Create a simple completion chart
- Set realistic daily goals
- Celebrate small victories
Understanding Color in Paint By Numbers
Color Relationships
Understanding how colors work together enhances your painting experience:
-
Light to Dark:
- Why we paint lighter colors first
- How colors create depth
- Understanding shadow effects
-
Color Transitions:
- How colors blend visually
- Creating smooth transitions
- Understanding color harmony
Visual Effects
-
Distance Effects:
- How colors appear to recede
- Creating depth perception
- Understanding atmospheric perspective
-
Color Impact:
- How colors affect mood
- Creating focal points
- Balancing color intensity
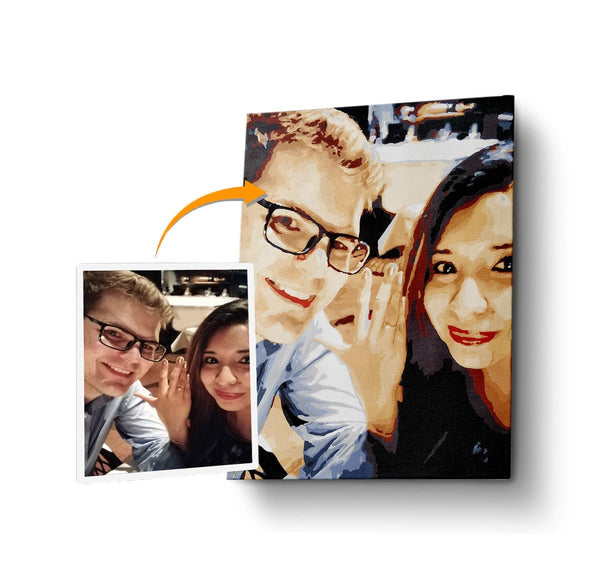
Choosing the Perfect Photo for Custom Paint By Numbers
Essential Photo Qualities
-
Lighting:
- Even, natural lighting
- Minimal harsh shadows
- Good contrast without being extreme
- Clear definition between elements
-
Clarity:
- Sharp, in-focus image
- High resolution (at least 1MB size)
- Clear subject matter
- Minimal blur or grain
Composition Tips
-
Subject Matter:
- Clear main subject
- Simple, uncluttered background
- Good separation between elements
- Interesting focal point
The Transformative Power of Paint By Numbers
Discover how this artistic journey benefits different age groups
For Adults
🧠 Mental Health Benefits
- Stress Reduction: Acts as a form of meditation through focused activity
- Mindfulness: Encourages present-moment awareness
- Anxiety Relief: Provides a calming, structured creative outlet
- Digital Detox: Offers a break from screen time
💪 Personal Development
- Patience Building: Develops long-term project skills
- Confidence Boost: Creates tangible achievements
- Focus Enhancement: Improves concentration abilities
- Pride in Achievement: Results in displayable artwork
For Seniors
🌟 Cognitive Benefits
- Memory Enhancement: Number and color matching exercises brain function
- Fine Motor Skills: Maintains hand-eye coordination
- Mental Acuity: Keeps mind sharp and engaged
- Pattern Recognition: Strengthens cognitive connections
❤️ Social & Emotional Benefits
- Social Connection: Creates talking points with family
- Sense of Purpose: Provides meaningful daily activity
- Legacy Creation: Creates gifts for family members
- Achievement Joy: Builds confidence and satisfaction
For Teenagers
🎯 Development Benefits
- Emotional Regulation: Provides healthy stress outlet
- Planning Skills: Develops project management abilities
- Self-Expression: Offers creative freedom within structure
- Focus Training: Improves concentration for studies
🌈 Social Benefits
- Achievement Sharing: Creates social media-worthy content
- Hobby Community: Connects with like-minded peers
- Screen-Free Time: Provides healthy entertainment alternative
- Confidence Building: Develops artistic abilities gradually
For Children
🌱 Developmental Benefits
- Motor Skills: Develops fine motor control
- Number Recognition: Strengthens numerical literacy
- Color Learning: Enhances color recognition
- Patience Development: Builds attention span
🎨 Educational Benefits
- Following Instructions: Builds sequential thinking
- Pattern Recognition: Develops logical thinking
- Artistic Confidence: Builds creative self-esteem
- Achievement Understanding: Teaches goal completion
Therapeutic Applications
Stress Management
- Reduces cortisol levels
- Creates mindful focus
- Provides peaceful activity
- Builds stress resilience
Mental Health Support
- Anxiety reduction through focus
- Depression management tool
- Builds sense of accomplishment
- Creates positive routines
Physical Benefits
- Improves hand steadiness
- Enhances eye-hand coordination
- Develops fine motor control
- Provides gentle exercise
Social & Community Impact
- Creates conversation starters
- Builds intergenerational connections
- Provides group activity options
- Creates shareable achievements
- Develops artistic community connections
Research-Backed Benefits of Paint By Numbers
Scientific evidence supporting the power of structured painting
Neurological Benefits
-
Brain Activity Enhancement:
- Activates multiple brain regions simultaneously
- Improves neural connectivity
- Enhances visual-spatial skills
- Strengthens memory pathways
Mental Health Impact
-
Stress Reduction:
- Lowers cortisol levels by up to 75%
- Reduces anxiety markers
- Promotes mindfulness state
- Increases relaxation response
Cognitive Enhancement
-
Focus and Concentration:
- Improves attention span by 32%
- Enhances task completion abilities
- Strengthens working memory
- Boosts problem-solving skills
The Power of Painting Alone
Personal Growth
-
Self-Discovery:
- Enhanced self-awareness
- Personal pace setting
- Independent decision making
- Individual creative development
Therapeutic Effects
-
Mental Space:
- Uninterrupted focus
- Deep concentration
- Emotional processing
- Stress release
Mindfulness Benefits
-
Present Moment Awareness:
- Enhanced focus
- Reduced anxiety
- Improved self-reflection
- Better emotional regulation
Long-Term Benefits
Cognitive Maintenance
- Sustained mental sharpness
- Better aging outcomes
- Enhanced memory function
- Improved focus abilities
Emotional Resilience
- Better stress management
- Increased emotional awareness
- Enhanced coping skills
- Greater self-confidence
Life Satisfaction
- Sense of achievement
- Creative fulfillment
- Personal growth
- Lasting memories
Problem-Solving Guide
Solutions for common challenges
🎨 Paint Issues
Paint Too Thick
- Add lukewarm water (one drop at a time)
- Mix thoroughly with toothpick
- Test on palette before canvas
Paint Too Thin
- Leave pot open for 5 minutes
- Apply multiple thin layers
- Wait for each layer to dry
Paint Drying Too Fast
- Work in smaller sections
- Keep unused pots tightly sealed
- Add tiny drop of water if needed
👁️ Number Visibility
When Numbers Are Hard to See
- Take photo before starting section
- Use phone's zoom feature
- Work under bright, natural light
- Use magnifying glass for tiny areas
Numbers Disappearing While Painting
- Take reference photos of sections
- Complete one small area at a time
- Mark completed areas on reference sheet
🖌️ Coverage Problems
Patchy Coverage
- Apply thin layers
- Let each layer dry completely
- Use cross-hatching technique
- Check paint consistency
Paint Bleeding Into Other Areas
- Use less water in paint
- Let adjacent areas dry fully
- Use paper guard technique
- Clean brush thoroughly between colors
Advanced Problem-Solving
Fixing Major Mistakes
If you've painted the wrong color or area:
- Let mistake dry completely
- Apply 2-3 thin layers of correct color
- Use cotton swab for precision
- Consider lighter colors first
Canvas Care
Preventing and fixing canvas issues:
- If canvas wrinkles: Iron from back on low heat (no steam)
- If canvas moves: Secure corners with painter's tape
- If canvas gets dirty: Use kneaded eraser gently
- If paint smudges: Let dry completely before touching
Brush Care
Fixing and preventing brush problems:
- Clean thoroughly between colors
- Shape tip while wet
- Store brushes horizontally or bristles up
- Never leave standing in water
Special Techniques & Artist Secrets
Advanced methods for stunning results
1. Detail Enhancement Techniques
For Face & Eyes
- Paint eyes first in portraits - they set the character
- Use toothpick for catch-lights in eyes
- Build skin tones in thin layers
- Let each layer dry completely
2. The Zigzag Technique
Perfect for creating smooth transitions:
- Work while paint is still slightly wet
- Use tiny zigzag strokes at color borders
- Clean brush thoroughly between colors
- Works best with similar shades
3. The Layering Method
For rich, vibrant colors:
- Apply first layer thinly
- Let dry completely (15-20 minutes)
- Add second layer in perpendicular direction
- Build up to 3 layers for best coverage
Special Area Techniques
For Landscapes
- Paint sky first - sets the mood
- Work background to foreground
- Use light, directional strokes for grass
- Create depth with darker foreground
For Water/Reflections
- Paint in horizontal strokes
- Lighter pressure for distant water
- Stronger strokes for foreground water
- Add reflections last
For Fur/Hair
- Follow natural growth direction
- Use dry brush technique
- Layer from dark to light
- Add highlights last
Advanced Color Management
Creating Depth
- Paint darker areas first
- Build up layers gradually
- Keep transitions smooth
- Add highlights last
Finishing Touches
Final Checks
- Check all areas in good lighting
- Look for any missed spots
- Ensure consistent coverage
- Touch up any thin spots
- Clean any smudges with damp cotton swab
Drying and Preservation
- Allow 24 hours for complete drying
- Keep away from direct sunlight while drying
- Store leftover paint for touch-ups
- Place flat while drying
Common Mistakes & How to Avoid Them
🚫 Most Common Mistakes
-
Rushing the Process
- Take breaks every 45-60 minutes
- Focus on one section at a time
- Allow proper drying time
-
Wrong Paint Consistency
- Should be like heavy cream
- Not watery or globby
- Mix thoroughly before use
-
Too Much Paint
- Less is more
- Build up in layers
- Dab excess on paper towel
⚠️ Critical Don'ts
- DON'T open all paint pots at once
- DON'T clean brushes with hot water
- DON'T mix colors unless specified
- DON'T paint over wet areas
- DON'T skip areas or numbers
- DON'T rush background areas
Expert Tricks That Make a Difference
🎯 Precision Work
- Keep a moist paper towel nearby for quick brush cleaning
- Use reading glasses or magnifier for tiny details
- Rotate canvas for easier angles
- Keep reference photo at eye level
🔍 Detail Enhancement
- Use natural light when possible
- Work in a well-lit environment
- Keep hands clean and oil-free
- Take progress photos daily
💡 Time-Saving Tips
- Pre-organize paints by number sequence
- Mark completed areas on reference sheet
- Use sticky notes to mark next sections
- Keep a painting diary for large works
Final Words of Wisdom
Remember these key points for success:
- Every mistake is fixable - don't panic!
- Take breaks when feeling frustrated
- Good lighting is crucial
- Clean tools make better results
- Enjoy the process - it's meant to be relaxing
Brush & Paint Maintenance
Brush Care
- Clean thoroughly after each color
- Reshape tip while wet
- Dry horizontally
- Store bristles up
Paint Storage
- Keep lids tight between uses
- Store at room temperature
- Keep away from direct sunlight
- Label any mixed colors
Quick Reference Guide
🎨 Essential Paint Tips
| Too Thick: | Add lukewarm water (1 drop) |
| Too Thin: | Leave open 5 mins |
| Drying Fast: | Work smaller sections |
| Best Consistency: | Like heavy cream |
🖌️ Brush Techniques
| Details: | Use brush tip only |
| Large Areas: | Cross-hatch strokes |
| Tiny Spots: | Use toothpick |
| Blending: | Zigzag motion |
⚡ Quick Fixes
| Smudges: | Damp cotton swab |
| Missing Spots: | Wait to dry, reapply |
| Wrong Color: | Let dry, paint over |
| Lost Numbers: | Check reference photo |
Frequently Asked Questions
Getting Started Questions
Q: Why are my numbers disappearing as I paint?
A: This is normal! Take a photo of your canvas before starting each section, or work in small areas at a time. The numbers are meant to be covered by paint.
Q: How long should I wait between colors?
A: For adjacent areas, wait 10-15 minutes or until completely dry to touch. For layering same color, 5 minutes between layers is usually sufficient.
Q: What's the best order to paint in?
A: Generally, work from top to bottom and light to dark colors. Complete all areas of one color before moving to the next.
Technique Questions
Q: How do I prevent paint bleeding into other sections?
A: Use less water in your paint, ensure adjacent areas are completely dry, and don't overload your brush. The paper guard technique also helps prevent accidental smudging.
Q: Should I use one or two coats of paint?
A: Most areas need 2-3 thin coats for optimal coverage. Better to build up in layers than apply one thick coat.
Q: What if I can't see the tiny numbers?
A: Take a clear photo with your phone before starting and zoom in, or use a magnifying glass. Good lighting is crucial for small details.
Troubleshooting Questions
Q: What if I painted the wrong color in an area?
A: Let it dry completely, then apply the correct color in thin layers. Most light colors will cover darker ones with 2-3 coats.
Q: Why does my paint look patchy?
A: Usually caused by:
- Paint too thin or thick
- Not letting layers dry
- Brush too dry
- Need additional coats
Q: Can I mix colors to match if I run out?
A: Not recommended. Each number corresponds to a specific shade. Contact customer service for replacement paint if needed.
Remember
Paint by Numbers is about enjoying the process. Take your time, be patient, and watch your masterpiece come to life!
👉 Keep Clean
Clean tools make better art
🎨 Stay Organized
One color at a time
💝 Have Fun
Enjoy the journey

Group Painting Benefits
Social Connection
Group Dynamics
Learning Benefits